
Every year, says the Environmental Protection Agency (EPA), household leaks waste more than 1 trillion gallons of water nationwide — equal to how much water more than 11 million homes would use annually. While some leaks are easily detectible, others may go unnoticed for months, ratcheting up your water bill and potentially causing damage to your home.
The biggest culprit of indoor water consumption? The bathroom. Leaking frequently occurs in toilets, faucets, shower head hose attachments and bathtubs. You must stay aware of leaks so you can take the proper steps to stop the water. Use this guide to learn how to locate and address leaks throughout your bathroom. Remember that before you try any of our solutions, you should turn off the water in the bathroom.
What Causes a Toilet to Leak?
If you have multiple people in a one or two-bathroom household and factor in guest visits, your toilet is used heavily. Although toilets can withstand this continual use, they also can get worn down and leak. You may have a difficult time detecting some toilet leaks. Your toilet could leak and you won’t even know it, though often you will hear if the toilet continues to run.
You could waste 200 gallons of water a day with a leaky toilet, says the EPA’s WaterSense project. Toilets can account for more than a quarter of your household water use, so keep your water bills low and address any issues that arise immediately to keep your toilet in excellent shape.
Internal Toilet Leaks
Toilets sometimes make a gurgling or hissing sound while they’re not in use to indicate a leak, but sometimes there’s no sound. Internal toilet leaks often go unnoticed, so you should know what causes a toilet to leak. An internal toilet leak could be the result of:
- An incorrect water level adjustment
- A damaged float
- A worn-out refill valve
To make sure your water level is where it should be, take the lid off of your toilet tank and look at the flush mechanisms to make sure the water level inside is no higher than 1 inch below the top of the overflow tube. If the water is at the top, water is likely leaking into your overflow tube and going down the drain, caused by an incorrect water level adjustment.
How to Test if Your Toilet is Leaking
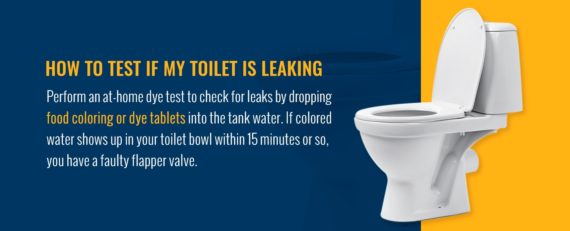
A damaged float that isn’t correctly shutting off the valve or a faulty valve could also be to blame. How will you know if you need a new flapper valve? Perform an at-home dye test to check for leaks by dropping food coloring or dye tablets into the tank water. If colored water shows up in your toilet bowl within 15 minutes or so, you have a faulty flapper valve.
These valves are located at the bottom of a toilet tank and create a watertight seal. This seal weakens over time, and water finds its way in, causing leaks. Luckily, worn flappers are simple to replace so you can get your toilet back in order.
Causes of a Toilet Leaking at the Base
Walking into your bathroom and seeing water around the base of your toilet typically indicates a toilet leak. A toilet leaking at the base is usually caused by one of two things:
- Loose tee bolts
- A damaged wax ring
To check your tee bolts, look at the plastic caps around your toilet’s base. These plastic caps cover the tee bolts that help keep your toilet secured on the floor. If these bolts break or become loose, water can get out and leak through a broken seal. While it could be as simple as tightening the bolts to create that water barrier, you may need to buy new ones if the bolts are still spinning around or appear broken.
If water remains on your bathroom floor after you fix the tee bolts, you probably need a new wax ring. Take a picture of your toilet’s base before you buy a new one so you can find a similar replacement. Use the water valve behind your toilet to shut off the water so you can flush once to remove as much sitting water as possible. Then plunge any leftover water from the base of the toilet.
To replace a wax ring, unscrew the tee bolts and put your toilet on its side to install the new one, which will go over the flange. Put your toilet back in its usual spot and push it into the wax ring, screw the bolts to secure your toilet to the ground, and reconnect your water line and turn the valve back on.
How to Fix a Leaking Bathroom Sink Faucet
Don’t let the continual dripping sound of your leaking bathroom faucet keep you up at night. Not only are bathroom leaking faucets an annoyance, but they may lead to a worse problem and drive up your water bill. You could save about 10 percent on your water bill by correcting your easy-to-fix household water leaks, according to the EPA.
If you have bathroom faucet leaks that drip once every second, you could waste more than 3,000 gallons of water each year — which is enough water to take almost 200 showers. Don’t keep wasting water. A leaky bathroom faucet could mean:
- You need to replace your cartridge insert
- You need new washers
- Your o-rings or valve cartridges are worn out or damaged
- You may need a new seal around the bathroom faucet base
Once you determine what’s causing your leak, you can determine how to fix it and stop your faucet that continuously drips.
Faucet Is Leaking From the Spout
Faucets account for more than 15 percent of household water use, per WaterSense. Leaks coming from your compression faucet’s spout are the most common faucet leaks and only get worse with time. Sometimes replacing a washer can help decrease leaking, but the issue may result in a more challenging process. Compression faucets are known to drip, and when new washers can’t remedy the situation, you might have to replace the valve seat.
A valve seat acts as a connector between the spout and the faucet within the compression mechanism. After washers or seals get pushed against the metal valve seats and wear out, it can cause continual drip that may lead to corrosion, staining and significant water waste over time.
Replacing a valve seat can be tricky. You need tools such as:
- Seat wrench
- Valve seat grinder or a dresser
- Seat sleeve
You’ll also need to find a new replacement seat that matches your old one exactly, which is difficult. To replace your valve seat, turn off the shutoff valve, remove the handle on your compression faucet, and use the wrench to remove the old seat. If that doesn’t work, you might need to insert a seat sleeve that will provide a tight seal and slide into the old seat, or use the seat grinder or dresser.
More and more people fix compression faucet leaks by swapping in cartridge faucets. To replace your cartridge, you’ll need a screwdriver, a knife, pliers, a wrench, some plumber’s grease, a plastic nut, which many replacement cartridges include, and a cartridge puller.
Shut off the water, take off the faucet handle and remove the faucet clip to get the old cartridge out and the new one put in. This can prove challenging, so you should contact a plumber for either of these repairs to fix the leaking faucet with no dripping.
Faucet Is Leaking From the Base
Sometimes faucet leaks aren’t as obvious as hearing the drip from the spout. Often when a faucet is leaking at the base, it can go undetected for long periods. For example, you might not think twice about water around the base of your sink since you’re used to splashing your hands around the base of your faucet after washing your hands. However, frequent puddles around your faucet on the sink deck are a sure sign of leaking.
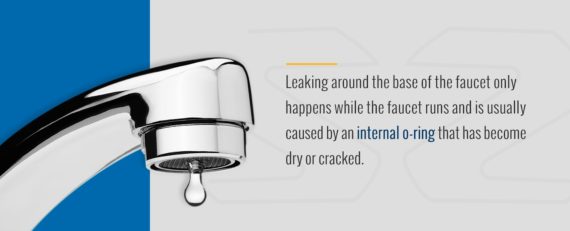
Leaking around the base of the faucet only happens while the faucet runs and is usually caused by an internal o-ring that has become dry or cracked. O-rings keep water out by sealing your faucet body. You can replace the damaged o-rings in a faucet to stop the leaking, but if damaged o-ring replacement doesn’t work, it’s likely a sign of a worn inner cartridge. While this is more uncommon, you can fix this by getting a new valve cartridge.
Worn-out washers are another common culprit behind a leaking faucet. Every time you use your faucet, the washer pushes against the valve seat and eventually wears out from all of the friction and causes dripping. You can solve this by replacing the washer, but you must install your new one correctly. If the new part is the wrong size or put in incorrectly, this could contribute to more leaks, so be careful when switching these out.
How to Fix a Leaking Showerhead or Bathtub Faucet
The EPA says a leaking shower head that drips 10 times a minute wastes more than 500 gallons of water annually — enough for your dishwasher to wash 60 loads of dishes. Just like toilets and faucets are in constant use, shower heads and bathtubs used at least once a day could develop a leak. Fixing your shower head or bathtub leak allows you to bathe efficiently and keep the cost of your water bill down.
First, rule out a clogged shower head. Loosen the nut that secures your shower head to the arm and take it off. Soak the shower head in white vinegar overnight. This softens the mineral deposits that have built up in the holes of your shower head and restricted the spray of water. After you soak it, buff any other residue away with an old toothbrush before putting it back up. If that doesn’t help, try these approaches to how to fix the leaking shower head.
What Is Causing My Shower Head to Leak?
While a little bit of water coming from your tub’s faucet is normal since the seal on the valve isn’t 100 percent perfect, a large amount of water coming from the faucet isn’t. This extra water indicates your leaking shower head may be the result of a leaky diverter valve.
Diverter valves are in your bathtub’s faucet and work to redirect water from the tub to the shower head when your shower lever is on. To fix a leaking shower head and correct a faulty valve, you could replace the part or do a diverter valve replacement. Here’s how to replace the part:
- See how the spout is attached and search for a setscrew or small hole on the underside of the spout.
- Once you find this hole or screw, put a washcloth or plug over the drain to keep the screw from falling down the drain, and then remove the screw using an Allen wrench.
- If you can’t find a hole or screw, your spout is connected to the supply pipe. Pull the spout off by turning it counterclockwise with a pipe wrench.
- Take out the rubber washer once the spout comes off, and replace it.
If this process isn’t successful, you probably need a completely new shower diverter valve. To ensure you get a leak-free shower head, we recommend calling a plumber for help.
Worn washers in the shower head might also cause a leak. Just like washers and o-rings create watertight seals between connections in your faucet, preventing leaks, they do the same for shower heads and have the same effect when they dry out or split. For shower heads with swivel connections, this happens more frequently. You can take your shower head off and deconstruct it to replace your washer and o-ring. This could also get tricky and require professional assistance if you don’t feel comfortable.
Why Is My Bathtub Leaking Onto the Floor?
A bathtub leaking onto the floor creates a slippery hazard and can quickly lead to severe damage. Leaks are likely caused by a worn seal around the bathtub and/or fixtures, allowing water to drip on the floor and potentially into the ceiling below, as water goes through the floor and behind the walls.
Tubs are sealed with caulk where the tub meets the wall. However, caulk may crack or become loose, letting water in through the worn seal. Prevent these leaks by inspecting your grout lines and caulk joints.
Your bathtub may also have a drain leak. If the drain fitting in the bottom of your tub or surrounding drain loosens, water can get under the bathtub, on the floor, behind walls and even leak through the floor. In a relatively hidden space, this leak could cause wood rot. See if your drain is leaking by using this method:
- Plug the tub and add water.
- Let it sit for an hour, and if the water level decreases, your drain is leaking.
- If it doesn’t drop but you notice water appearing outside of your bathtub when you let it drain, your drain piping is likely to blame.
Loose tile behind the tub spout is another sign of a leaking bathtub. Look for any discoloration and water behind the faucet if you can remove a tile to reach the access panel. To check for a tub spout leak, you may have to cut into the tile or drywall, which can be risky to do alone. Contact a professional plumber for assistance as they are experts and know how to fix bathtub leaks safely and properly, sparing you additional renovations.
How to Fix a Leaking Sink Pipe

Have you ever walked into the bathroom and wondered, “Why is my cabinet wet under the sink?” Protect your cabinets and belongings inside under your bathroom sink by looking out for leaking sink pipes. Don’t wait to fix a leak under your sink until after your things get soaked. Water may be leaking under your sink due to:
- Lack of plumber’s tape between the drain pipe and the threads on the nut
- A loose nut
- An off-center drain pipe
- A cracked drainpipe
- A washer or an o-ring that is too tight
- Lack of plumber’s putty
To fix your bathroom drain pipe leak, start by checking the nut to see if it needs to be re-tightened or if the rubber sealing washer or gasket needs to be loosened. If it still leaks after you adjust the nut, take the drain pipe and drain outfit flange apart. When you take the pipe and outfit flange out, examine them for cracks or stripped plastic or metal threads. If nothing looks damaged, you won’t need to purchase new parts, but you will need plumber’s tape and putty.
When you put the sink drain back in, add a thick, circular layer of plumber’s putty under the drain’s top flange before applying plumber’s tape to the drain threads. Consider where the nut will be when it’s fully tightened, and use plenty of tape to cover the nearby threads. Spin the nut down or off the threads before putting the drain back into the sinkhole.
Put the nut and sealing washer in and tighten them, removing any excess putty that oozes into the sink. Finally, add plumber’s tape to the drainpipe near the threads and put the drain pipe back in, ensuring it is not too tight and is positioned correctly. After everything is back in, run the water and check for a bathroom leak under the sink cabinet.
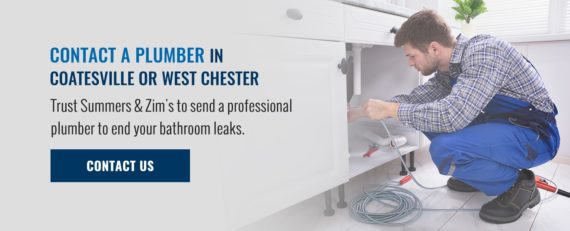
Contact a Plumber in Coatesville or West Chester
Leaks are a silent danger to your home. Although some of these leaks have relatively simple solutions, some are too complicated to conquer alone.
Trust Summers & Zim’s to send a professional plumber to end your bathroom leaks. Summers & Zim’s has served Lancaster, Chester and Delaware counties for more than 80 years, providing exceptional service backed by a 100 percent money-back guarantee. We also offer free estimates for our plumbing services. Don’t wait to act on your leaky bathroom appliances. Contact us today.